Dancers Guide to Running
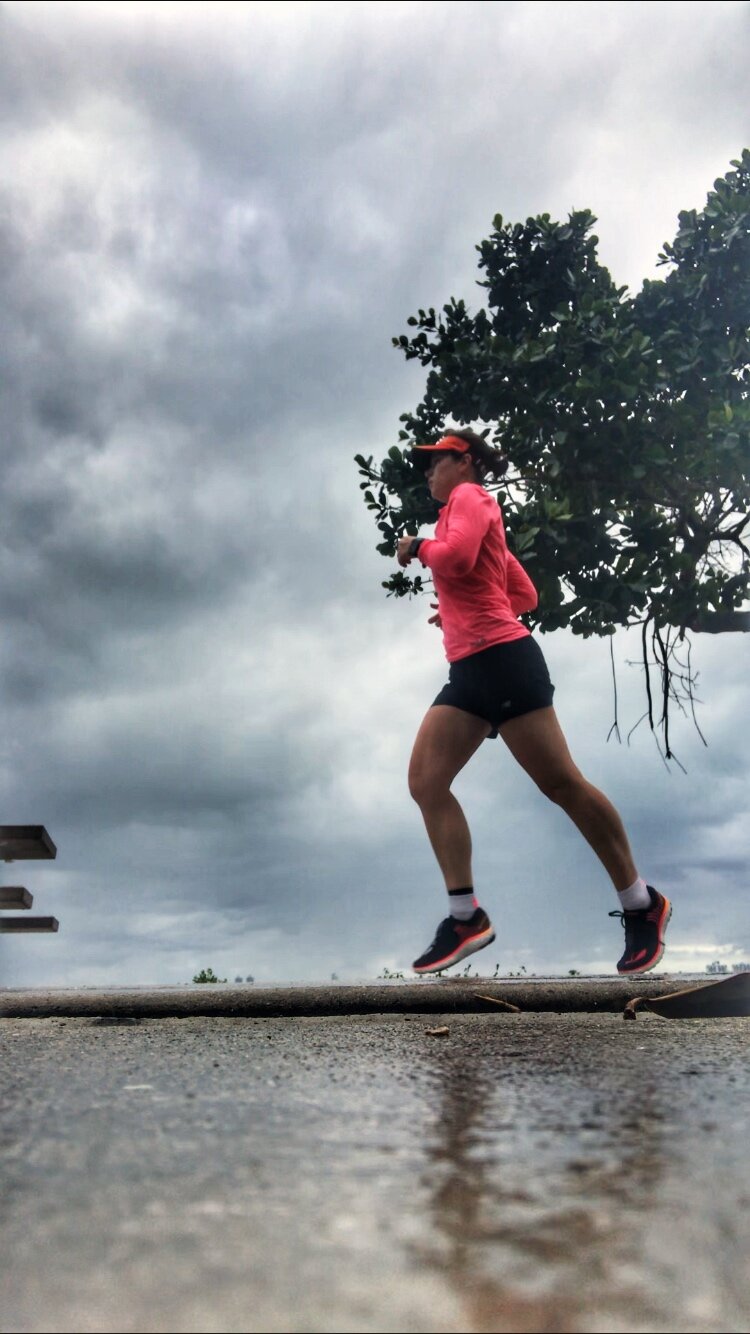
For me few things compare to lacing up a pair of running shoes, tossing on a visor and heading out the door for a quick run. In 2016 I dove into endurance triathlons and what had previously been a 3-mile run squeezed in sporadically became regular weekly 8- to 10-mile runs, and “commuting” runs to work once a week. I found myself researching running, and trying to learn everything I could to avoid injuries. I learned that fitting a running shoe is no less intricate than fitting a pointe shoe. I noticed that lower leg injuries in dancers are similar to those in runners. I realized that the same exercises I was teaching to dancers as cross training could be applied to my own training regime, and by doing them I was becoming a stronger runner and avoiding injuries myself. I talked myself out of every excuse I had used as a kid, and after about 6 months of really sticking to a solid training plan I began hitting the runner’s high on a regular basis. If you haven’t hit it, the runner’s high is that moment when your body just goes, and you are no longer thinking about how hard you are working, your mind is crystal clear, and everything feels, not just right, but exhilarating.
Over the last week a handful of dancers have reached out to me with questions about running. Their questions have ranged from “should I run,” to “what kind of shoes should I be wearing,” and “how do I get started running?” To answer these and more running questions, I am going to share some knowledge I’ve gained over the last few years on how to properly get into a running routine.
Busting the Myths
For years I have had both dancers and PT’s tell me that running is bad for dancers. Until I really understood running I too believed this, I now know that running can be a great adjunct to the demands of dancing during the off season and rehearsal period. While ballet dancers tend to spend most of their time strengthening their “turn out” or external rotator muscles, running helps to create strength in the internal rotators. This improves the balance of the musculature surrounding and supporting the hips and pelvis, as well as gives a break to the overused external rotators. Running can also help improve strength and endurance needed for long variations. If you really think about it, running is just a sustained petite allegro, a series of small quick jumps from one foot to the other but maintained for a longer duration of time. By adding an easy run into your program 2-3 days a week you will also gain the cardiovascular endurance to improve your overall stamina and performance.
Both novice runners and dancers alike have expressed concerns to me that running can be hard on the knees and other joints. While running can place increased stress through your joints it has actually been shown to help your joints as well. Many seasoned runners have lower incidence of knee pain than their non-runner, age matched counterparts. Running itself can help to strengthen both bones and muscles; it is also thought to do the same for the cartilage that helps to cushion the joints. Just like dancing if you have poor technique and the joint mechanics are altered, there is risk for cartilage breakdown, increased aches and pains and increased chance of sustaining an overuse injury such as tendonitis. A good running program should build you up slowly, helping to create proper muscle balance, strength and stamina to support the joints and make running enjoyable.
Last but not least my favorite myth to bust is that “I will develop bulky muscles if I run”. I used to challenge my high school dancers to find me a picture of a “bulky” distance runner. If you google runners from 5K to marathon distance you will find that they have lean defined muscles, much like dancers, and not excessive muscle bulk like a sprinter or weightlifter. This comes down to the activity that you are working on and the muscle fibers that are being developed. When we look at muscle development, the body has two main types of muscle fibers:
Type 1 muscle fibers- slow twitch
These are the endurance muscles, they take much longer to fatigue and require less carbohydrate to power due to high density of mitochondria
Mitochondria are your cellular powerhouse! Mitochondria take oxygen and carbohydrates and turn them into energy for your muscle cells to use.
Have a smaller diameter leading to a more lean muscle appearance
Type 1 fibers help with sustained movement, and endurance to finish variations.
Type 2 muscle fibers- fast twitch
Type IIa- help with moderate power activities that require sustained effort
They are relatively resistant to fatigue
Assist with repetition of movement
Type IIb- help with the quick bursts of high power
These fibers fatigue very quickly
They are recruited for very high intensity and short duration movement
Type II muscle fibers have larger diameter leading to greater muscle bulk
Type II muscle fibers help dancers to complete powerful explosive jumps.
Dancers want a balance of both Type I and Type II muscle fiber types; a cross training plan that adds in running for 30-60 minutes 2-3 times per week will help to build muscular endurance, lean muscles and improve the body’s ability to recruit both type I and type II muscle fibers.
Safe ways to start running
While most dancers are able to run a 5K (3.1 miles), it’s not something that I recommend if you have never completed a run program. As we discussed before, running recruits your muscles in a different way than dance does, and to avoid injury I recommend most of my dancers to begin with a run/walk program. There are many apps that you can download that walk you through the progression. Run/walk progressions help to build up the muscular endurance needed for running a 5K with good form without over fatiguing your muscles or causing too much stress into your joints. You may find that you do not need to start at day 1, and instead can start with a progression of running/jogging for 1.5-2 minutes followed by a walk interval.
If you feel that you have a good base and would rather just focus on running, I would recommend doing a heart rate based program. Programs that focus on heart rate based training help you to improve your aerobic system without overstressing your skeletal and muscular systems. Heart rate training is based off of zones 1-5 using your maximum heart rate (HR max). The best equation currently available to determine your HR max is (208-(0.7x age). Once you have your HR max you can do some simple math to determine your zones as follows:
Zone 1 50-60% of HR max
Zone 2 60-70% of HR max
Zone 3 70-80% of HR max
Zone 4 80-90% of HR max
Zone 5 90-100% of HR max
For dancers I recommend focusing any heart rate based run program on zones 2 and 3 as they offer the greatest overall health and conditioning benefits.
Zone 2 is where you can create the greatest amount of muscular endurance.
This is where you improve your body's ability to burn fat for fuel.
Build mitochondria
More mitochondria in your cells leads to improved oxygen and carbohydrate utilization to power your muscles
Lowest risk of injury
Runs tend to be longer when training in this zone, 45 minutes plus
Zone 3 is where your body will find the most cardiovascular benefit.
This is the aerobic zone, where you develop the greatest amount of cardiovascular stamina and increase overall aerobic capacity
The body will burn more glycogen (carbohydrate) instead of fat
Run’s in this zone tend to be shorter, 30-45 minutes
If you are working on building stamina for specific choreography I recommend working with a knowledgeable practitioner to build an interval program that incorporates training in high HR zones.
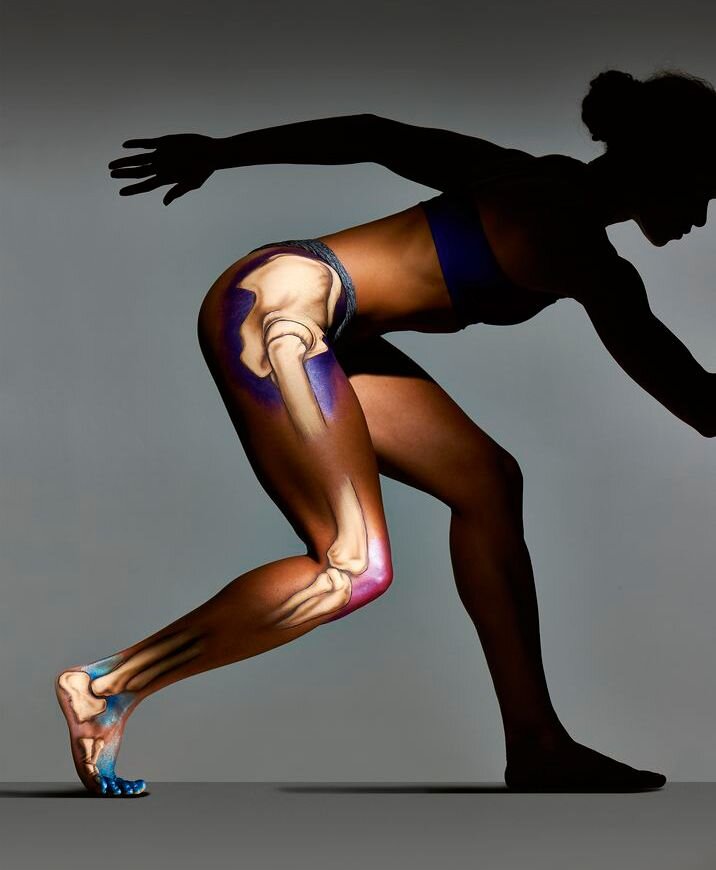
Running mechanics
Running mechanics are critical in maintaining a healthy musculoskeletal system when running and avoiding injury. These are the main things that I look for when evaluating someone who runs or I am building a run plan for:
Footstrike
While there is still no clear consensus on one pattern of footstrike being better than the other there are some things to consider.
There are 3 main footstrike patterns:
Heel strike
Heel strike is like a walking gait
The heel makes the initial contact with the ground, the foot then lowers to the ground, your weights shift forward and you push off of your toes
This pattern can lead to increased shin splints due to increased work by the tibialis anterior after heel strike.
If you are prone to shin splints see if you can use one of the other patterns
Midfoot strike
Midfoot strike is similar to doing a quick march in place
You land closer to the front/middle of the foot, the heel makes contact with the ground and you push off
Without shoes on most people naturally run with this gait pattern, it offers the greatest control without overusing any specific muscle group.
Forefoot strike
A forefoot strike is similar to how you would run for ballet, but with your feet under you a bit more
The ball of the foot makes contact, you roll through the foot until the heel hits that ground and then quickly push off
This footstrike pattern has the greatest load on the calf muscles, if you are prone to achilles tendonitis or calf injuries see if you can focus on midfoot strike
To determine your best footstrike pattern try running in grass or on a soft surface with bare feet and see which footstrike pattern feels natural; this should carry over into how you footstrike or land in a pair of shoes as well.
While each footstrike pattern has its pros and cons the best thing to do is work with whichever feels right for you. Now is not the time to completely change your running pattern.
Hip Drop
The next movement I look for when evaluating someone’s running is their ability to maintain a relatively level pelvis and avoid the pelvis dropping down to one side. This drop is known as hip drop and is caused by weakness in the lateral hip muscles, this weakness causes the hip opposite of the standing leg to drop when it is loaded. If you notice that you have hip drop or hip weakness it is important to address it with specific strengthening exercises as this can lead to injuries higher up the chain into the low back or down the chain into knee and foot. These lateral muscles such as the gluteus medius, gluteus minimus and external rotators are also very important for creating the stability of the hip and pelvis needed in dancers.
Cadence and stride length
While cadence and stride length are not the first thing that I look for I do evaluate them as it can be a cause of injury and often overlooked in novice runners. The quicker your feet are moving the less likely you are to overstride. Overstriding can lead to less efficiency and increase the risk for injury. A longer stride places increased load into the musculoskeletal system causing more work in the muscles surrounding the hips and knees. If you shorten your stride length and increase the amount of steps per minute, you actually decrease the amount of effort needed to protect the joints and propel the body forward. While there is no one optimal cadence or stride length I recommend trying to find your groove between 160-190 steps per minute.
Get the Gear
While running is a relatively inexpensive activity to add into your cross training program, I highly recommend finding a good pair of running shoes that will offer the right level of support for your foot. I have also listed other gear that may help you to monitor your running and track your level of activity.
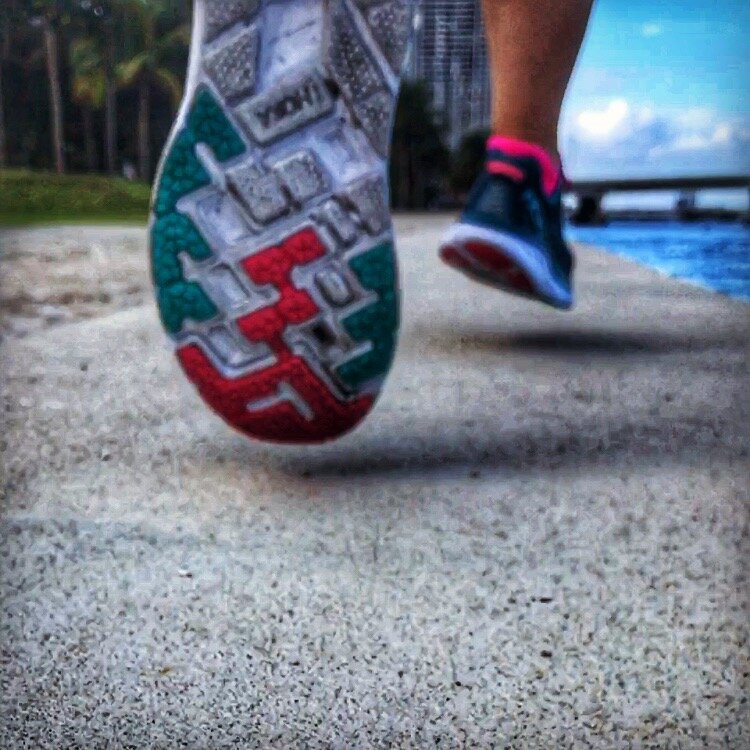
Picking the best shoe for you
I always recommend supporting your local running store by going in to have your initial pair of shoes fit. Just like finding the right pointe shoe this can be a process but these individuals understand running gait, the shoes that are available, and which will be the best starting place for you. I know that we all want to look stylish in our shoes, but musculoskeletal health should be the main goal when it comes to shoes. I know that many stores are not open right now, so I want to explain a little about running shoes and my recommendations. But much like a pointe shoe it’s about finding the right shoe for you.
Shoe support
Neutral (where I would start)- provides equal support on the inside and outside of the shoe.
Most dancers with good strength should do well in a neutral shoe
If you buy a neutral shoe and begin to develop knee pain you can buy a pronation support insole for your shoe
Pronation support- offers increased support on the inside of the shoe
Best if you are someone whose foot collapses inward when landing from a small jump
Supination support
Best if you are someone who walks primarily on the outside of your foot
Heel to toe drop (also called heel drop)
Heel to toe drop is the difference between the height at the back of the shoe vs. the height at the toe of the shoe
A ballet or pointe shoe has a 0mm drop, a pair Hoka running shoes have a 5mm drop, a pair of Asics have 10mm drop
I recommend a 0-5mm drop in your running shoes so that you continue to work and strengthen in the same range of motion that you use for dance. But if you are prone to achilles tendon injury, or run with a heel strike pattern a high heel drop may be better suited
0-5mm low is considered a low heel drop
Hoka, Altra, Saucony, On-running
7mm or over considered a high heel drop
Asics, Brooks, New Balance
If you are returning from a lower leg injury you may want to start with a higher heel drop and gradually work into a lower one
Shoe inserts- I do not tend to start anyone with shoe inserts. It is best to understand how the foot and body are going to react first before adding an insert to your shoes
Shoe care recommendations
I recommend having one pair of shoes dedicated to running. Your running gait and walking gait are different and will break your shoes in differently.
Recommended mileage for most running shoes is 300-400 miles. This has to do with the cushion and support offered by the shoe. Once you reach 400 miles you can switch these to walking shoes.
If you run 3 miles 3 days a week a pair of shoes should last you about 11 months
HR monitors
There are many options for HR monitors
Chest straps are the most accurate. You can find ones that sync to your phone via a bluetooth signal, or that pair directly to a run based device such as a Garmin.
Watches- Devices such as the Apple watch, Fitbit and others offer sleek heart rate based monitoring. Run specific options can offer even more specific metrics for runners
Headphones- there are now numerous headphones on the market that can also monitor you HR while running or training
Cadence
If you listen to music while you run you can find playlist set to specific bpm (available on Spotify) or create your own
Can work on warm-up drills (see below) with a metronome
Apps
Couch to 5K for beginning a run program
Strava for tracking routes, speeds and distance
Key exercises for running
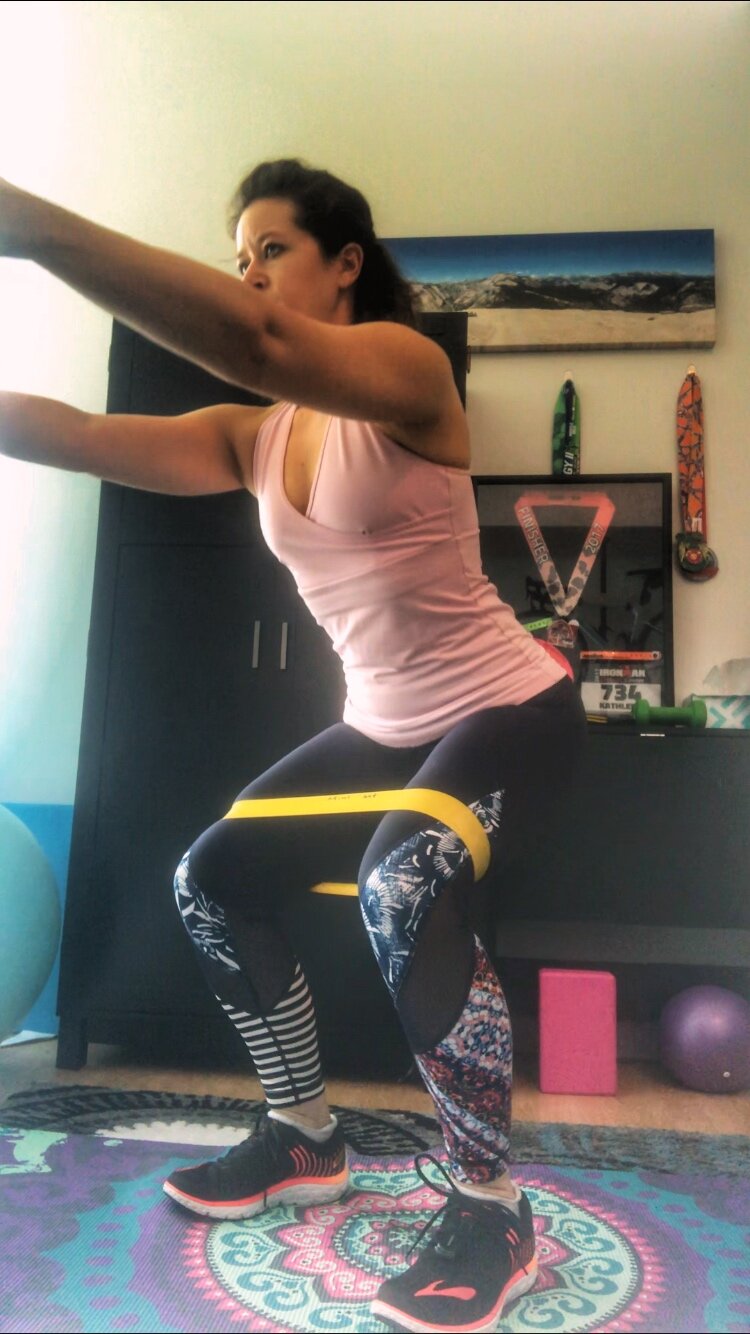
Begin with a band place just above the knees
lightly press knees out into band without compressing into low back
squat down towards the floor sending your hips back and your knees slightly forward while maintaining outward press on band
Try not to squeeze through gluts as you lower yourself down
Feel your sit bones separating and you lower down
Use your gluts to press you back up into standing position
repeat this exercise 10 times
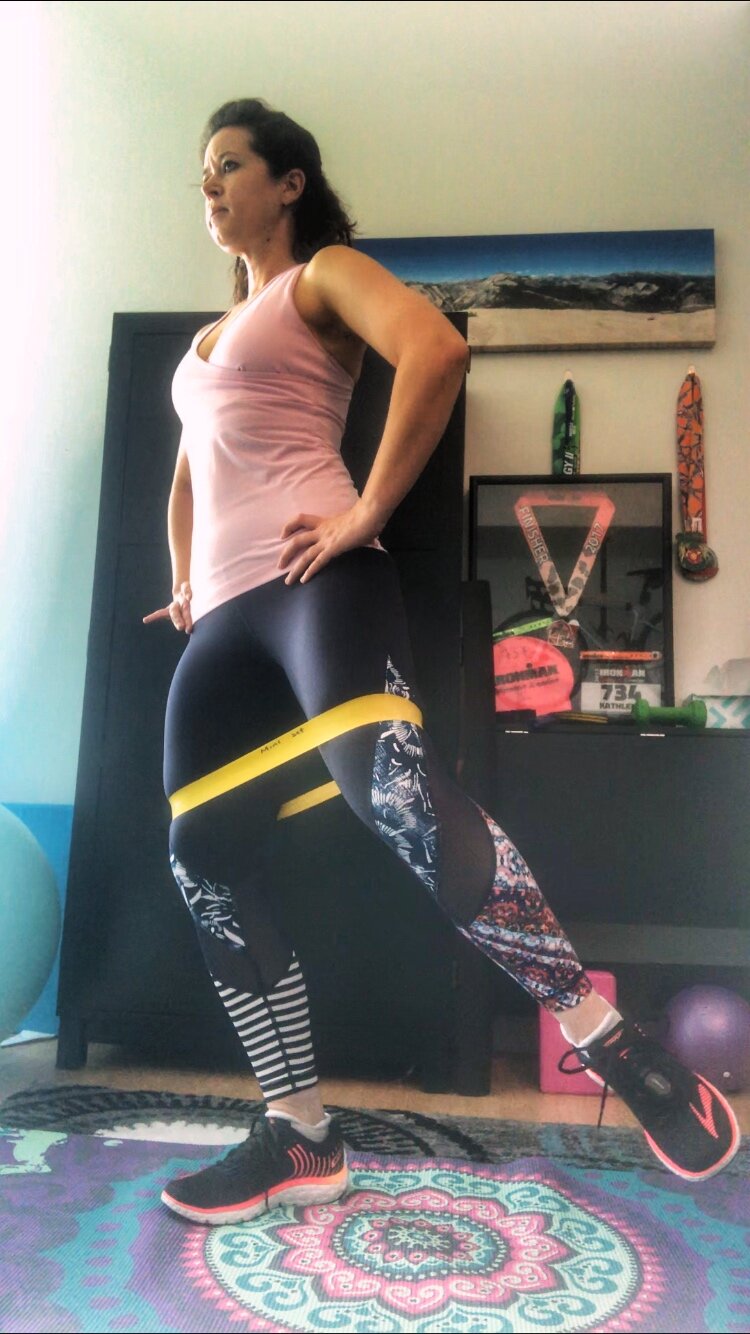
Standing Hip Abduction w/ Band
Have a band placed just above the knees, unlock the hips so you are in a shallow squat position
shift your weight over onto one leg, maintaining a neutral pelvis position
Try not to tip towards your supporting side
keeping a slight bend in the unweighted leg lift out to the side without tipping the pelvis
make sure that you keep a slight pressure out into the band on the standing leg so that the knee does not drop in
complete ~10 leg lifts and then switch and repeat on the opposite side
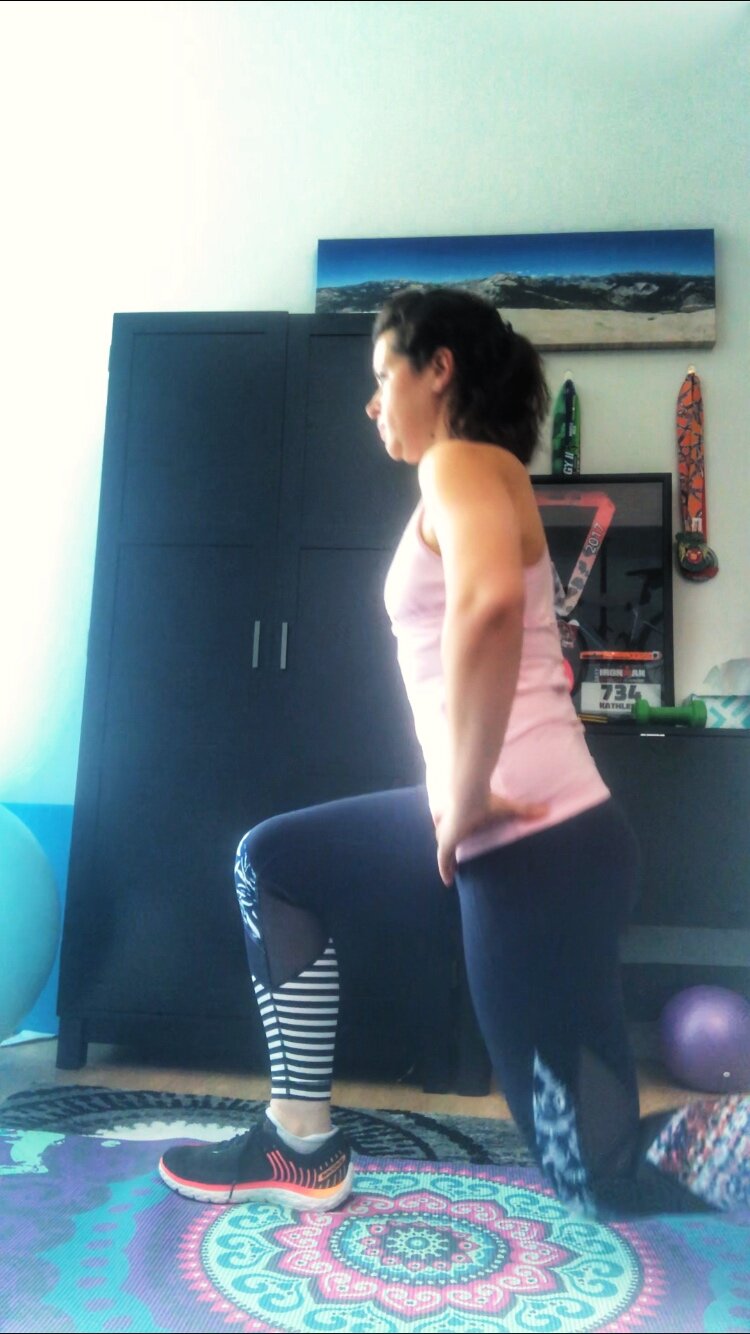
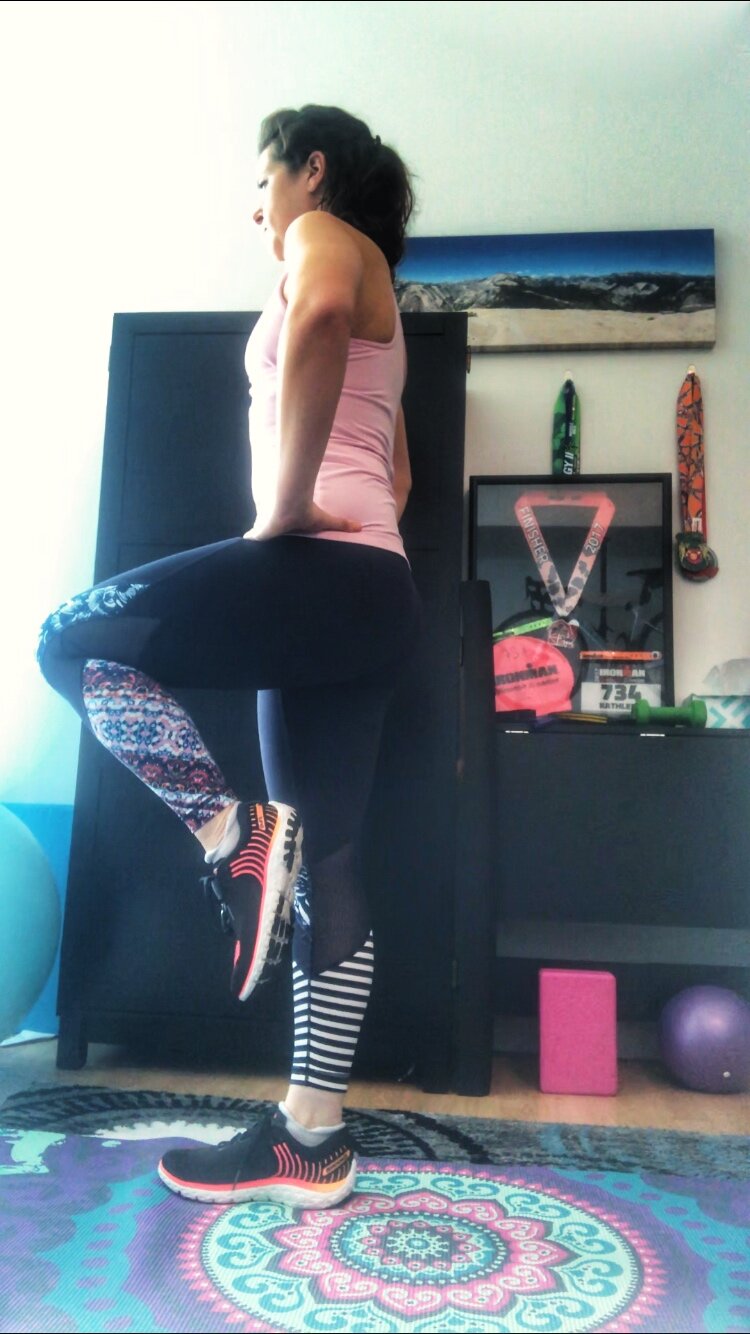
Forward Lunges
Begin in a parallel pasé position
step leg back dropping the knee straight down towards the floor
goal is to eccentrically load the gluts and hamstrings
maintain a neutral back and level pelvis position
if you hip flexors are tight you may have to angle forward slightly
use your glut max to press back up to pasé position
repeat this ~10 times on each side
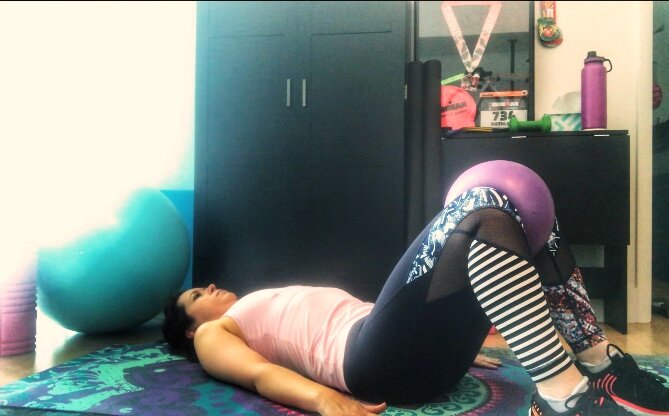
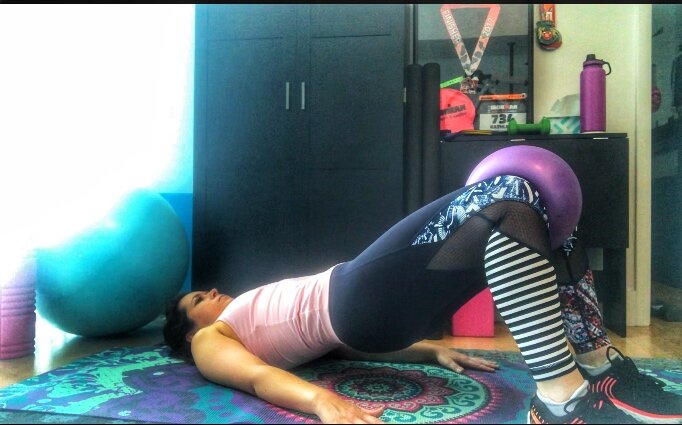
Bridging with ball between knees and leg extension
Begin lying on your back with your knees bent and your feet flat on the floor
I like to add a ball between the legs to improve the adductors and midline engagement, and try to avoid overusing the lateral muscles
lift your hips up towards the ceiling keeping light pressure in on the ball
should feel more medial glut activation, and decreased tension across sacrum
feet should remain grounded equally into the floor with in inside and outside of the foot
complete ~10 times
To advance this exercises extend one leg out
maintain the pelvis in a neutral position, try not to let it tilt to one side or for the tailbone to drop down towards the floor
alternate extending legs 10 times

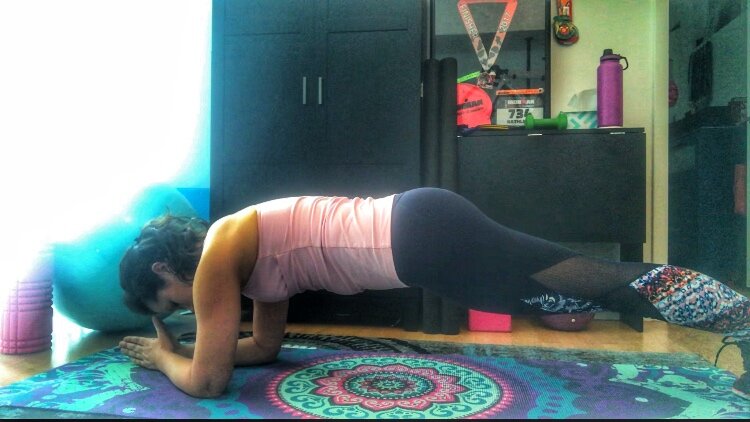
Plank with knee drop
begin in a plank position on your elbows, with your hips lifted slightly so they are in line with your shoulders
drop one knee down towards the floor while maintaining neutral back and neutral pelvis position
repeat alternating legs 30 seconds- 1 minute

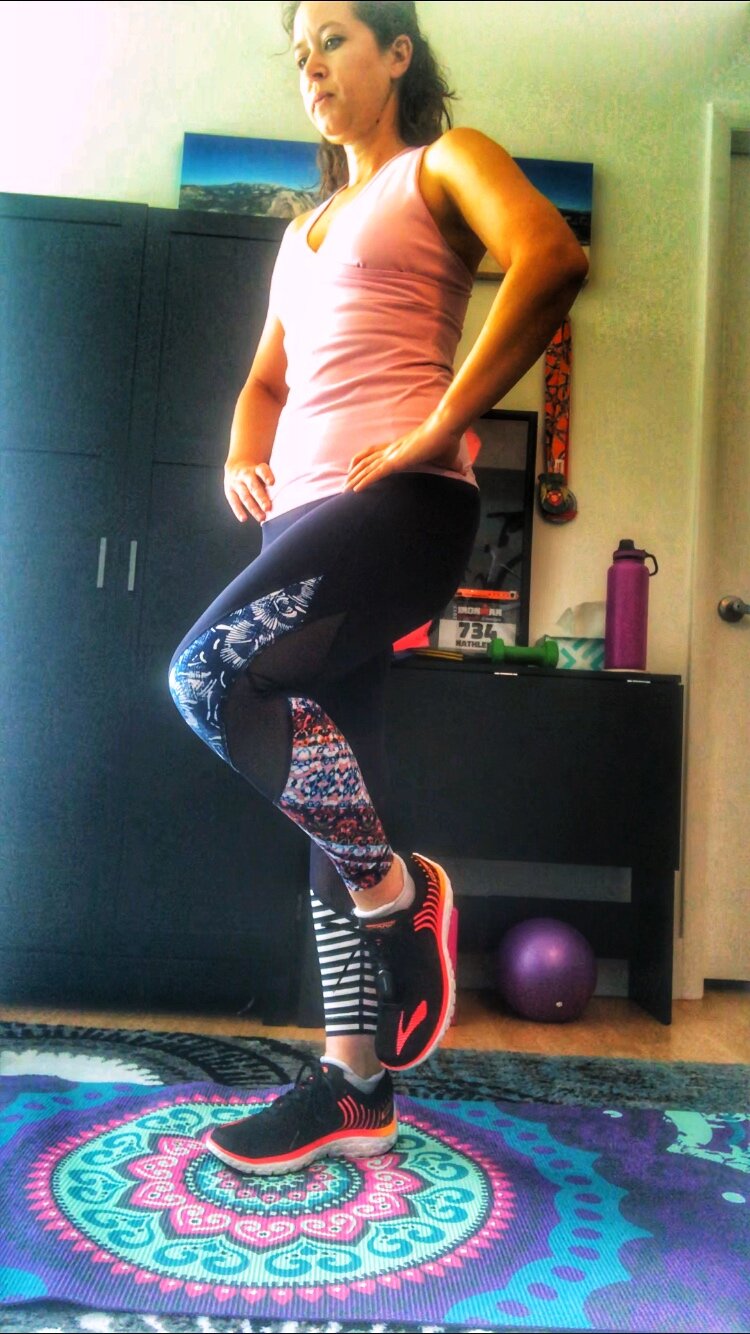
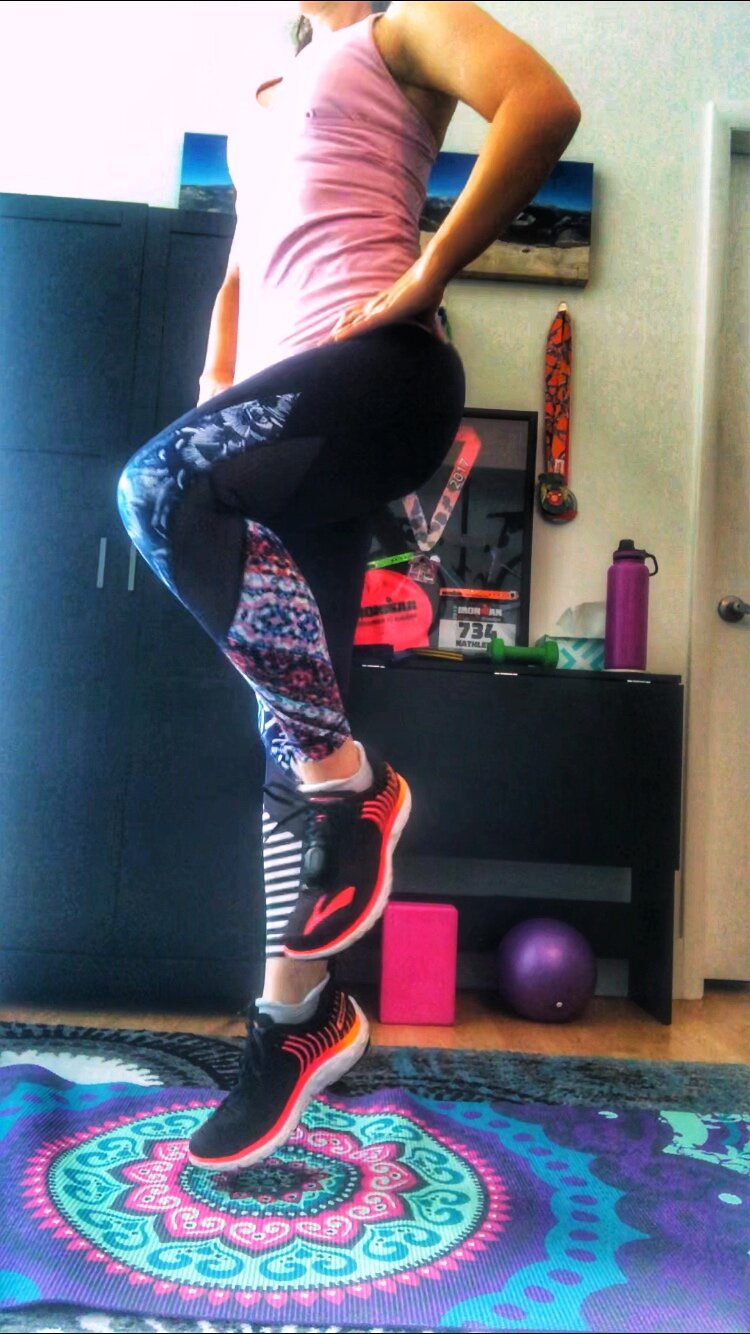
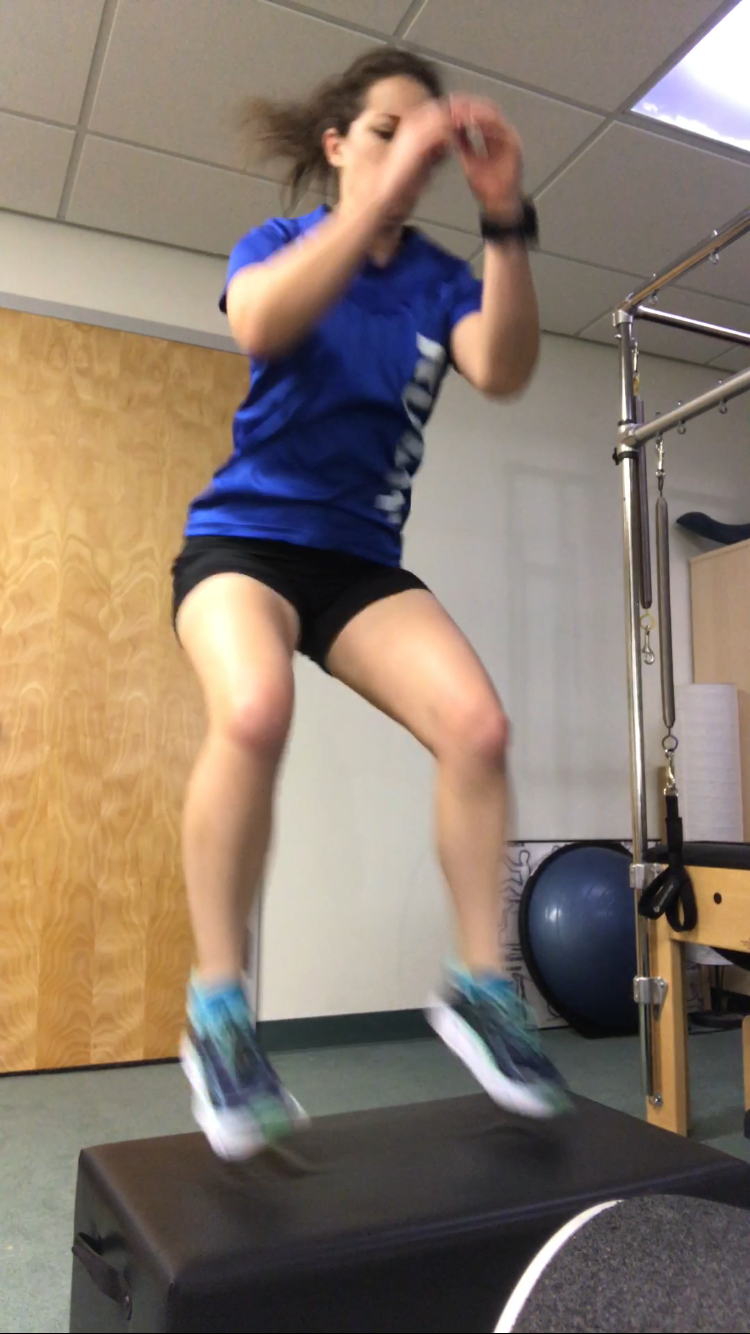
Warm-up jump progression at 180 bpm
use a metronome set to ~180 bpm and begin jumping on 2 feet
your feet should just clear the floor
after about 30 second lift one foot off and see if you can maintain a single leg jump at 180 bpm
after 15 seconds see if you can switch sides
see if you can maintain the 180 bpm while switching feet (running in place) ~30 second
I use this exercise as a quick warm up before I go out and begin my run session
If you are unsure of where to start a running program and would like more information you can contact me at Thedancedocs@gmail.com and we can set up an online consultation.
Here’s to many miles ahead!
In Health,
Dr. Kat